

In this example we will create a basic infrared thermometer using an MLX90614 and Wemos Mini (ESP8266) and an OLED
This was created basically of the current virus scare – not to make money but as hopefully a useful little electronic addition to check your temperature
Here is the human temperature range from Wikipedia
The MLX90614 is an infrared thermometer for non-contact temperature measurements. Both the IR sensitive thermopile detector chip and the signal conditioning ASIC are integrated in the same TO-39 can. Integrated into the MLX90614 are a low noise amplifier, 17-bit ADC and powerful DSP unit thus achieving high accuracy and resolution of the thermometer.
The thermometer comes factory calibrated with a digital SMBus output giving full access to the measured temperature in the complete temperature range(s) with a resolution of 0.02°C.
The user can configure the digital output to be pulse width modulation (PWM). As a standard, the 10-bit PWM is configured to continuously transmit the measured temperature in range of -20 to 120°C, with an output resolution of 0.14°C.
Features
-
Factory calibrated in wide temperature range: -40 to 125°C for sensor temperature and -70 to 380°C for object temperature
-
High accuracy of 0.5°C over wide temperature range (0..+50 C for both Ta and To)
-
Medical accuracy of 0.1°C in a limited temperature range available on request
-
Measurement resolution of 0.02°C
Schematic
I connected an OLED shield to the Wemos Mini and the MLX90614 breakout to the oled shield
| Wemos Mini | MLX90614 breakout |
| 3v3 | Vin |
| GND | Gnd |
| SDA | SDA |
| SCL | SCL |
Parts Required
No affiliate links – this is information in the time of a health crisis where even the ability to create an accurate thermometer could be important. Not cashing in on this.
You can find these parts on many sites
| ESP8266 – wemos mini |
| Wemos OLED shield – Amazon |
| MLX90614 breakout – Amazon search |
| Connecting wire – Amazon |
Code example 1
This first example uses the Adafruit MLX90614 library and is the default example. You can add the library using the Library manager in the arduino ide
[codesyntax lang=”cpp”]
#include <Wire.h>
#include <Adafruit_MLX90614.h>

Adafruit_MLX90614 mlx = Adafruit_MLX90614();

void setup() {
  Serial.begin(9600);

  Serial.println("Adafruit MLX90614 test");

  mlx.begin();
}

void loop() {
  Serial.print("Ambient = "); Serial.print(mlx.readAmbientTempC());
  Serial.print("*C\tObject = "); Serial.print(mlx.readObjectTempC()); Serial.println("*C");
  Serial.print("Ambient = "); Serial.print(mlx.readAmbientTempF());
  Serial.print("*F\tObject = "); Serial.print(mlx.readObjectTempF()); Serial.println("*F");

  Serial.println();
  delay(500);
}
[/codesyntax]
Here is the output in the serial monitor
Ambient = 25.81*C Object = 25.11*C
Ambient = 78.46*F Object = 77.20*F
OLED Example
Now as you will have seen from the description we are ultimately trying to display the temperatures on an OLED
You need https://github.com/sparkfun/SparkFun_Micro_OLED_Arduino_Library
[codesyntax lang=”cpp”]
#include <Wire.h>  // Include Wire if you're using I2C
#include <SFE_MicroOLED.h>  // Include the SFE_MicroOLED library
#include <Adafruit_MLX90614.h>

#define DC_JUMPER 0  // I2C Addres: 0 - 0x3C, 1 - 0x3D
#define PIN_RESET 255

Adafruit_MLX90614 mlx = Adafruit_MLX90614();
MicroOLED oled(PIN_RESET, DC_JUMPER); // Example I2C declaration


void setup()
{
  Serial.begin(9600);
  mlx.begin();
  oled.begin();
  oled.clear(ALL);  // Clear the display's memory (gets rid of artifacts)
  oled.display();
}

void loop()
{
  // Wait a few seconds between measurements.
  delay(2000);

  oled.clear(PAGE);
  oled.setFontType(0); // set font type 0, please see declaration in SFE_MicroOLED.cpp
  oled.setCursor(1, 3);
  oled.print("Ambient: ");
  oled.setCursor(1, 12);
  oled.print(mlx.readAmbientTempC());
  oled.print(" %\t");
  oled.setCursor(1, 21);
  oled.print("Object :");
  oled.setCursor(1, 30);
  oled.print(mlx.readObjectTempC());
  oled.print(" *C ");
  oled.display();
}
[/codesyntax]
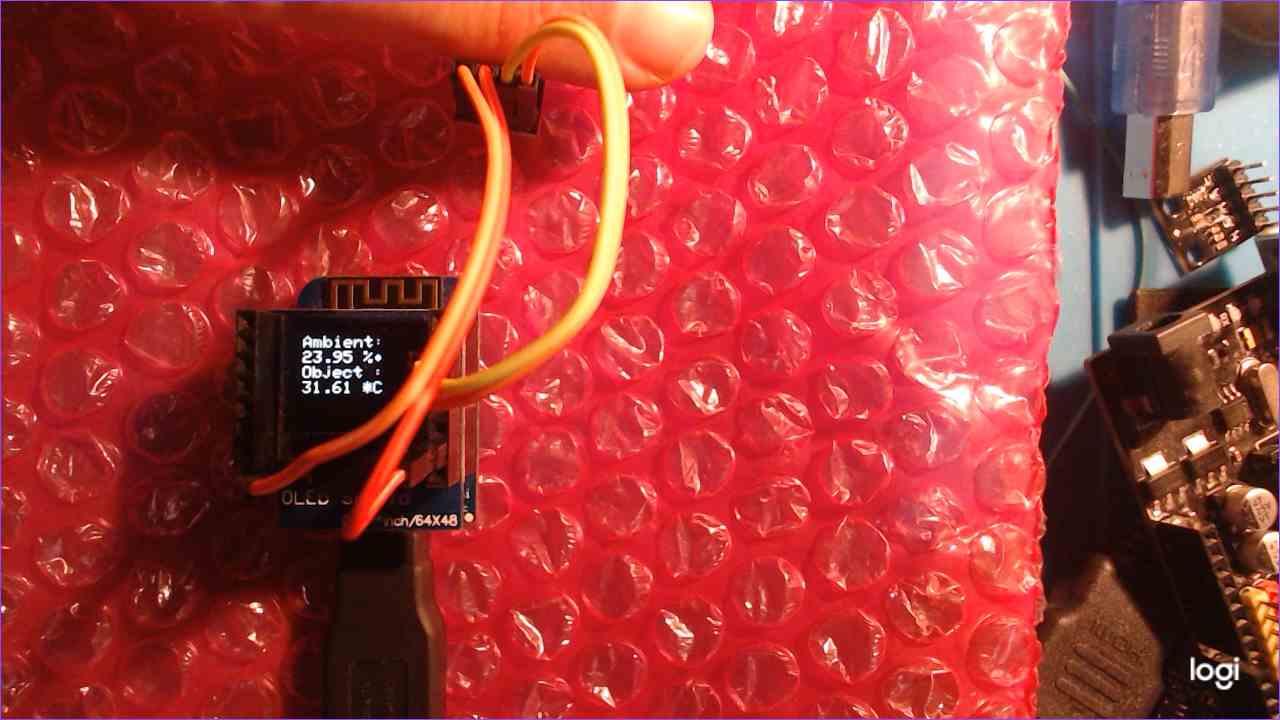
Here you can see the setup in action
You could design a box for this with an external power source, we will be looking at other sensors and other microcontrollers as well
Links
https://www.melexis.com/en/documents/documentation/datasheets/datasheet-mlx90614