

In this example I decided to take a look at one of the Digispark clone boards that are available. These boards are based around the ATtiny85 which have the micronucleus bootloader installed, this means you can then use the Arduino IDE as usual
There are instructions for setting up your Arduino IDE at http://digistump.com/wiki/digispark/tutorials/connecting, rather than repeating everything I recommend reading the steps there
In the Arduino “Board Manager”. That is “Digispark (Default – 16.5mhz)” under “Tools → Board”
When you have a program ready to upload you need to disconnect the board from the USB cable! Then press the upload button in the Arduino IDE interface and you will be asked to connect the board in the next 60 seconds. After you connect the digispark board don’t press anything and justwait until the code is uploaded.
Schematic
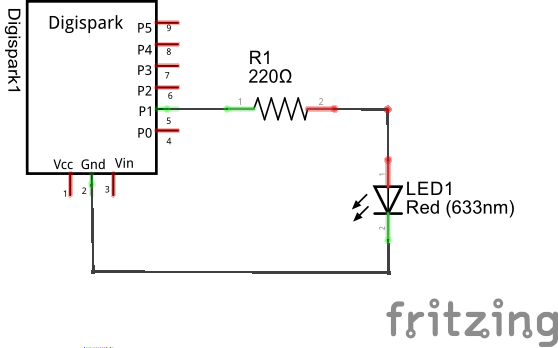
Digispark LED schematic
Code
This is a simple flash an LED example, the LED is connected to pin 1 in my example
[codesyntax lang=”cpp”]
#define Ledpin 1 // Select the pin where the led is attached

void setup()
{
pinMode(Ledpin, OUTPUT); // initialize the digital pin as an output.
digitalWrite(Ledpin, LOW); // Set it in Low state
}


void loop()
{
Toggle();
delay(500);
}


void Toggle(void)
{
if(digitalRead(Ledpin)==HIGH)
{
digitalWrite(Ledpin, LOW);
}
else
{
digitalWrite(Ledpin, HIGH);
}
}
[/codesyntax]
Links
Digispark Kickstarter ATTINY85 General Micro USB Development Board
Digispark Pro kickstarter development board use Micro ATTINY167 module for Arduino