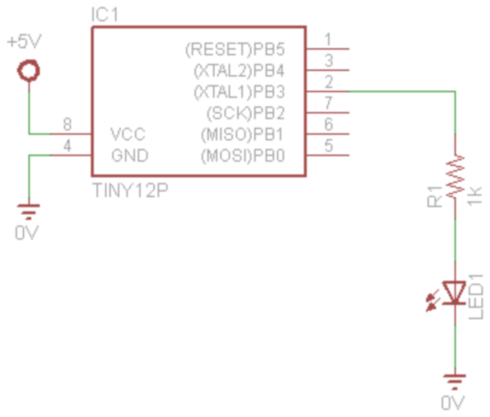
The hello world of examples this time for an ATTINY85, although this should work with similar chips as well. We will connect the LED to pin 2 (PB3) and simply flash it on and off.
Here is our schematic
Schematic
Code
The code was written in Atmel Studio
[cpp]
#include <avr/io.h>
#define F_CPU 1000000UL
#include <util/delay.h>
// Define the I/O port to be used for the LED.
#define LED_PORT PB3
int main(void) {
// Set the LED port number as output.
DDRB |= (1 << LED_PORT);
// Start infinite loop.
while (1)
{
// Set the LED bit to "1" – LED will be "on".
PORTB |= (1 << LED_PORT);
// The delay function simply does N-number of "empty" loops.
_delay_ms(200);
// Set the LED bit to "0" – LED will be "off".
PORTB &= ~(1 << LED_PORT);
_delay_ms(400);
}
return (0);
}
[/cpp]
And another way
[cpp]
#include <avr/io.h>
#define F_CPU 1000000UL
#include <util/delay.h>
// Define the I/O port to be used for the LED.
#define LED_PORT PB3
int main(void) {
// Set the LED port number as output.
DDRB |= (1 << LED_PORT);
// Start infinite loop.
while (1)
{
// Set the LED bit to "1" – LED will be "on".
PORTB |= (1 << LED_PORT);
// The delay function simply does N-number of "empty" loops.
_delay_ms(200);
// Set the LED bit to "0" – LED will be "off".
PORTB &= ~(1 << LED_PORT);
_delay_ms(400);
}
return (0);
}
[/cpp]