

In this particular example we are going to display temperature readings from a DS18B20 on an OLED display, we will be using a Wemos mini and a variety of shields which make it easy to create projects like this with no wiring.
Lets take a look a the shields and boards
| Image | Summary |
 |
The Wemos mini – ESP8266 based board, it comes with various headers. This is the beauty of it you can create stackable projects with the board and pin compatible shields |
 |
Not an official Wemos board but readily available featuring the ever popular DS18B20 temperature sensor |
 |
A little 64×48 OLED screen |
 |
This is simply a base, you plug the Wemos Mini into one side and you can plug a shield or shields into the other side |
Parts List
1 x Wemos Mini
1 x Wemos Dual Base
1 x OLED Shield
1 x Ds18B20 shield
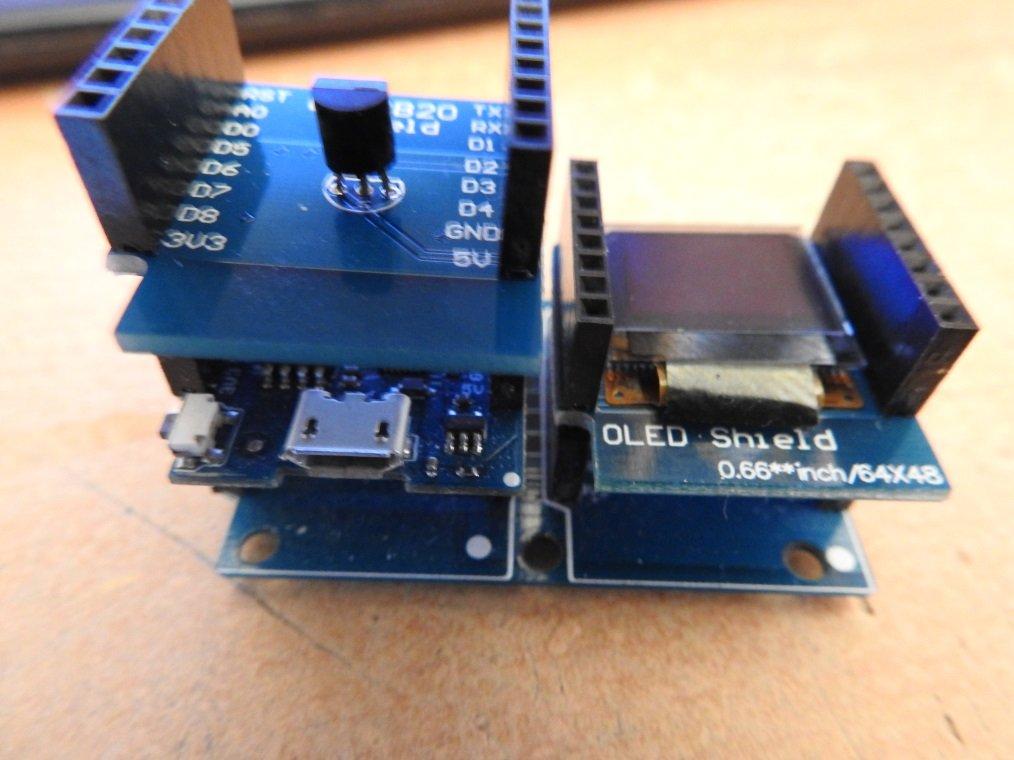
I connect the Wemos Mini to the dual base and then put the OLED shield along side this, I then place the DS18b20 shield on top of the Wemos Mini. This image hopefully shows this
Code
Various libraries required – you can install these via the library manager, here are links to them
https://github.com/sparkfun/SparkFun_Micro_OLED_Arduino_Library
You will also have to install the OneWire library
[codesyntax lang=”cpp”]
#include <OneWire.h>
#include <SFE_MicroOLED.h> // Include the SFE_MicroOLED library
#define PIN_RESET 255 //
#define DC_JUMPER 0 // I2C Addres: 0 – 0x3C, 1 – 0x3D
// OneWire DS18S20, DS18B20, DS1822 Temperature Example
OneWire ds(D2); // on pin D2 (a 4.7K resistor is necessary)
MicroOLED oled(PIN_RESET, DC_JUMPER); // Example I2C declaration
void setup(void)
{
Serial.begin(9600);
oled.begin();
oled.clear(ALL); // Clear the display’s memory (gets rid of artifacts)
oled.display();
}
void loop(void)
{
byte i;
byte present = 0;
byte type_s;
byte data[12];
byte addr[8];
float celsius, fahrenheit;
if ( !ds.search(addr))
{
ds.reset_search();
delay(250);
return;
}
if (OneWire::crc8(addr, 7) != addr[7])
{
Serial.println(“CRC is not valid!”);
return;
}
// the first ROM byte indicates which chip
switch (addr[0])
{
case 0x10:
type_s = 1;
break;
case 0x28:
type_s = 0;
break;
case 0x22:
type_s = 0;
break;
default:
Serial.println(“Device is not a DS18x20 family device.”);
return;
}
ds.reset();
ds.select(addr);
ds.write(0x44, 1); // start conversion, with parasite power on at the end
delay(1000);
present = ds.reset();
ds.select(addr);
ds.write(0xBE); // Read Scratchpad
for ( i = 0; i < 9; i++)
{
data[i] = ds.read();
}
// Convert the data to actual temperature
int16_t raw = (data[1] << 8) | data[0];
if (type_s) {
raw = raw << 3; // 9 bit resolution default
if (data[7] == 0x10)
{
raw = (raw & 0xFFF0) + 12 – data[6];
}
}
else
{
byte cfg = (data[4] & 0x60);
if (cfg == 0x00) raw = raw & ~7; // 9 bit resolution, 93.75 ms
else if (cfg == 0x20) raw = raw & ~3; // 10 bit res, 187.5 ms
else if (cfg == 0x40) raw = raw & ~1; // 11 bit res, 375 ms
}
oled.clear(PAGE);
oled.setFontType(0); // set font type 0, please see declaration in SFE_MicroOLED.cpp
oled.setCursor(1, 3);
celsius = (float)raw / 16.0;
fahrenheit = celsius * 1.8 + 32.0;
oled.print(“Cels = “);
oled.setCursor(1, 12);
oled.print(celsius);
oled.print(” *C”);
oled.setCursor(1, 21);
oled.print(“Fahr =”);
oled.setCursor(1, 30);
oled.print(fahrenheit);
oled.print(” *F”);
oled.display();
}
[/codesyntax]
Can’t be bothered typing all that in – Wemos_OLED_DS18b20
Output
Here you can see the output and my setup
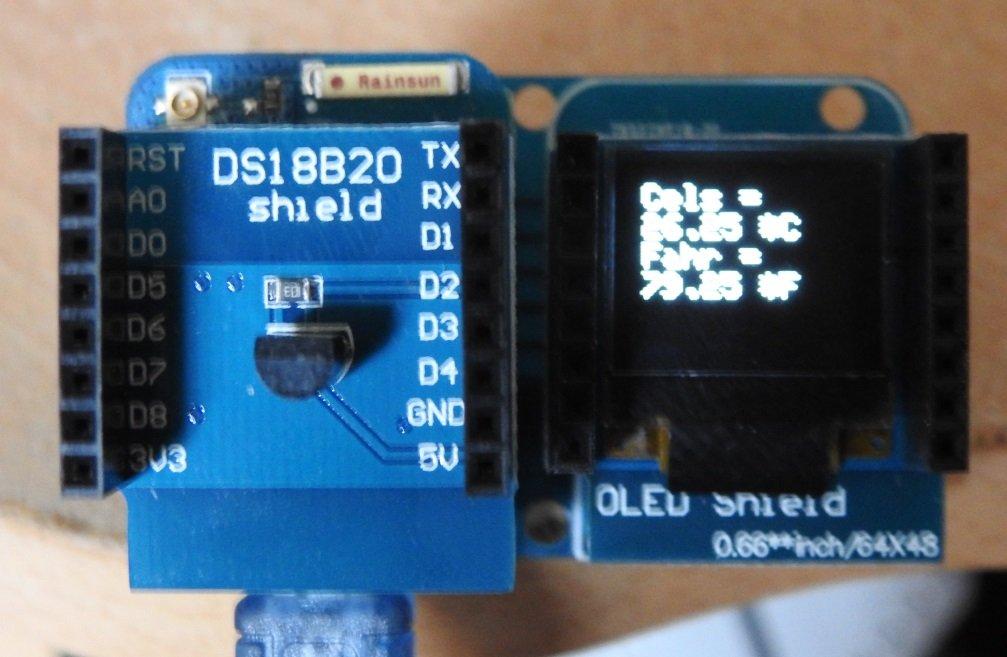
DS18b20 and WEMOS output
Links
You can hopefully pick this all up for $10
Smart Electronics D1 mini – Mini NodeMcu 4M bytes development board based ESP8266 by WeMos
Shield for WeMos D1 mini V2 DS18B20 Single-bus digital temperature and humidity sensor module sensor
0.66″ inch For Wemos Oled 64X48 IIC I2C LCD OLED LED Display Shield
Dual Base Expansion board for WeMos D1 mini NodeMCU ESP8266