

The Honeywell HMC5883L is a surface-mount, multi-chip module designed for low-field magnetic sensing with a digital interface for applications such as low-cost compassing and magnetometry. The HMC5883L includes our state-of-the-art, high-resolution HMC118X series magneto-resistive sensors plus an ASIC containing amplification, automatic degaussing strap drivers, offset cancellation, and a 12-bit ADC that enables 1° to 2° compass heading accuracy. The I2C serial bus allows for easy interface. The HMC5883L is a 3.0×3.0x0.9mm surface mount 16-pin leadless chip carrier (LCC). Applications for the HMC5883L include Mobile Phones, Netbooks, Consumer Electronics, Auto Navigation Systems, and Personal Navigation Devices.
The HMC5883L utilizes Honeywell’s Anisotropic Magnetoresistive (AMR) technology that provides advantages over other magnetic sensor technologies. These anisotropic, directional sensors feature precision in-axis sensitivity and linearity. These sensors’ solid-state construction with very low cross-axis sensitivity is designed to measure both the direction and the magnitude of Earth’s magnetic fields, from milli-gauss to 8 gauss. Honeywell’s Magnetic Sensors are among the most sensitive and reliable low-field sensors in the industry.
FEATURES
12-Bit ADC Coupled with Low Noise AMR Sensors Achieves 2 milli-gauss Field Resolution in ±8 Gauss Fields
Low Voltage Operations (2.16 to 3.6V) and Low Power Consumption (100 μA)
I2C Digital Interface
Wide Magnetic Field Range(+/-8Oe)
Fast 160Hz Maximum Output Rate

Parts List
Layout
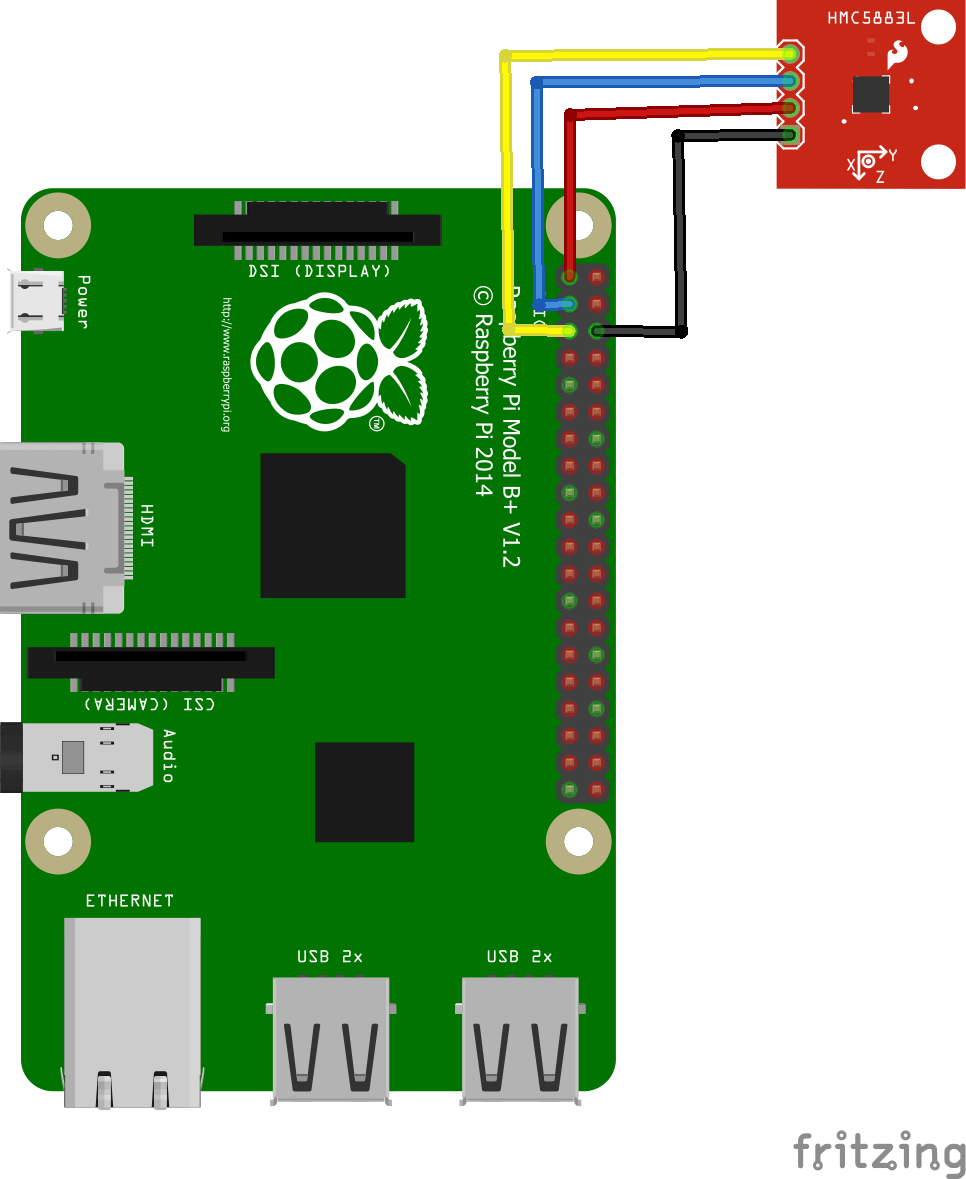
pi and hmc5883 layout
Code
Save the following as HMC5883.c
[codesyntax lang=”cpp”]
#include <stdio.h>
#include <stdlib.h>
#include <linux/i2c-dev.h>
#include <sys/ioctl.h>
#include <fcntl.h>

void main()
{
	// Create I2C bus
	int file;
	char *bus = "/dev/i2c-1";
	if ((file = open(bus, O_RDWR)) < 0)
	{
		printf("Failed to open the bus. \n");
		exit(1);
	}
	// Get I2C device, HMC5883 I2C address is 0x1E(30)
	ioctl(file, I2C_SLAVE, 0x1E);

	// Select Configuration register A(0x00)
	// Normal measurement configuration, data rate o/p = 0.75 Hz(0x60)
	char config[2] = {0};
	config[0] = 0x00;
	config[1] = 0x60;
	write(file, config, 2);
	// Select Mode register(0x02)
	// Continuous measurement mode(0x00)
	config[0] = 0x02;
	config[1] = 0x00;
	write(file, config, 2);
	sleep(1);

	// Read 6 bytes of data from register(0x03)
	// xMag msb, xMag lsb, zMag msb, zMag lsb, yMag msb, yMag lsb
	char reg[1] = {0x03};
	write(file, reg, 1);
	char data[6] ={0};
	if(read(file, data, 6) != 6)
	{
		printf("Erorr : Input/output Erorr \n");
	}
	else
	{
		// Convert the data
		int xMag = (data[0] * 256 + data[1]);
		if(xMag > 32767)
		{
			xMag -= 65536;
		}

		int zMag = (data[2] * 256 + data[3]);
		if(zMag > 32767)
		{
			zMag -= 65536;
		}

		int yMag = (data[4] * 256 + data[5]);
		if(yMag > 32767)
		{
			yMag -= 65536;
		}

		// Output data to screen
		printf("Magnetic field in X-Axis : %d \n", xMag);
		printf("Magnetic field in Y-Axis : %d \n", yMag);
		printf("Magnetic field in Z-Axis : %d \n", zMag);
	}
}
[/codesyntax]
Testing
run the example above – sudo python HMC5883.py