

In this article we take a look at a neat little ESP32 with an OLED built in to it. It is called the Heltek WiFi Kit 32
Lets look at the highlights of this board
ESP32 (dual-core 32-bit MCU + ULP core);
Onboard SH1.25-2 battery interface, integrated lithium battery management system
Onboard Wi-Fi, Bluetooth 2.4GHz PCB antenna
Onboard 0.96-inch 128*64 dot matrix OLED display
Integrated CP2102 USB to serial port chip
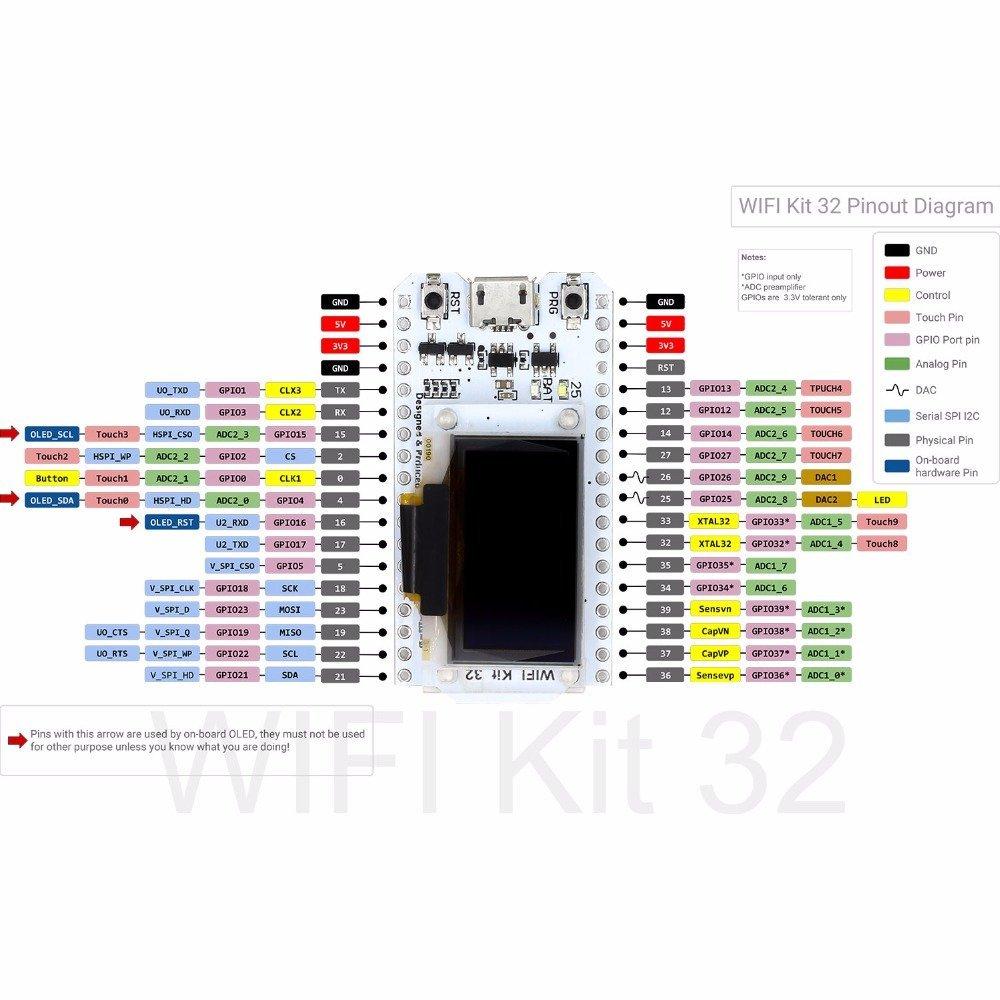
Here is an image and pinout of this module
Tech Specs
| Name | Description | |
| Processor | ESP32( 240MHz Tensilica LX6 dual-core + 1 ULP, 600 DMIPS, 520KB SRAM, Wi-Fi, dual mode Bluetooth) | |
| Hardware | UART x 3; SPI x 2; I2C x 2; I2S x 1 | |
| 12 – bits ADC; 8 – bits DAC | ||
| 29 general GPIO | ||
| Display | 0.96 inch 128*64 OLED display | |
| FLASH | 4MB(32M-bits) SPI FLASH | |
| Interface | Micro USB x 1 | |
| Size | 50.2 x 25.5 x 9.74 mm | |
| USB to UART bridge | CP2102 | |
| Battery Type | 3.7V Lithium (SH1.25 x 2 sockets) | |
Parts List
You can pick one of these up for under $9 using the link below, a very good price for a board with these features
| Name | Link |
| ESP32 WiFi Kit | ESP32 WiFi Kit CP2012 Development Board with 0.96″ OLED Display |
Installation and support
You need to add support for this board, the easiest method is to use the arduino board manager
Input last esp32 board manager URL
https://docs.heltec.cn/download/package_heltec_esp32_index.json
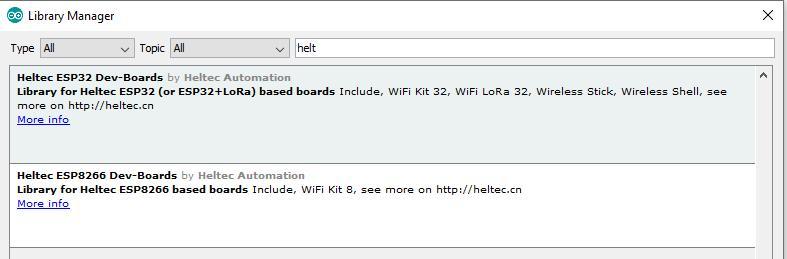
Click Tools->Board:->Boards Manager..., search Heltec ESP32 in the new pop-up dialog, then click install
Download the Heltec ESP32 Library
There is an ESP32 library that you can install and use, to do this follow the steps below
Open Arduino IDE, then Select Sketch->Include Library->Manage Libraries... Search Heltec ESP32 and install it
Code example
I recommend looking at the wifi scan example, it is the hello world of Wifi examples
[codesyntax lang=”cpp”]
/*
 *  This sketch demonstrates how to scan WiFi networks.
 *  The API is almost the same as with the WiFi Shield library,
 *  the most obvious difference being the different file you need to include:
 */
#include "WiFi.h"

void setup()
{
    Serial.begin(115200);

    // Set WiFi to station mode and disconnect from an AP if it was previously connected
    WiFi.mode(WIFI_STA);
    WiFi.disconnect();
    delay(100);

    Serial.println("Setup done");
}

void loop()
{
    Serial.println("scan start");

    // WiFi.scanNetworks will return the number of networks found
    int n = WiFi.scanNetworks();
    Serial.println("scan done");
    if (n == 0) {
        Serial.println("no networks found");
    } else {
        Serial.print(n);
        Serial.println(" networks found");
        for (int i = 0; i < n; ++i) {
            // Print SSID and RSSI for each network found
            Serial.print(i + 1);
            Serial.print(": ");
            Serial.print(WiFi.SSID(i));
            Serial.print(" (");
            Serial.print(WiFi.RSSI(i));
            Serial.print(")");
            Serial.println((WiFi.encryptionType(i) == WIFI_AUTH_OPEN)?" ":"*");
            delay(10);
        }
    }
    Serial.println("");

    // Wait a bit before scanning again
    delay(5000);
}
[/codesyntax]
If you run this it will scan for any Wifi networks that are in range, you should open the serial monitor and you will something like this
scan start
scan done
2 networks found
1: nottellingyou (-73)*
2: topsecret (-90)*