

7K
In this simple example for a Digispark board we connect an 128 x 64 OLED display to it. We will then use the Arduino IDE to write a sketch and upload it to the board.
I used an OLIMEXINO-85 but a basic Digispark will work as well
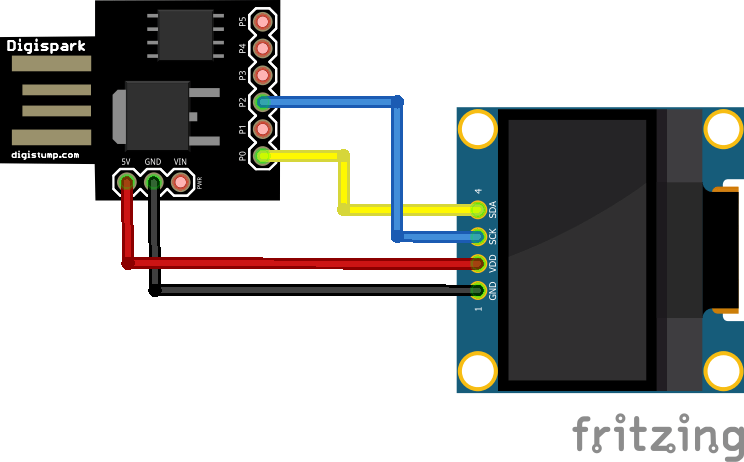
Schematic
Its an I2C OLED so its easy to connect to the Digispark boards
Parts
A Digispark, OLED and some wires to connect the OLED to the Digispark
| £2.19 from Aliexpress | |
| £1.19 from Aliexpress | |
| £1.18 from Aliexpress | |
Examples
This uses the DigisparkOLED library which is installed
[codesyntax lang=”cpp”]
#include <DigisparkOLED.h>
#include <Wire.h>
// ============================================================================

void setup()
{
  // put your setup code here, to run once:
  oled.begin();
}

void loop()
{
  // put your main code here, to run repeatedly:
  oled.fill(0xFF); //fill screen with color
  delay(1000);
  oled.clear(); //all black
  delay(1000);
  //usage: oled.setCursor(X IN PIXELS, Y IN ROWS OF 8 PIXELS STARTING WITH 0);
  oled.setCursor(0, 0); //top left
  oled.setFont(FONT8X16);
  oled.print(F("DIGISTUMP")); //wrap strings in F() to save RAM!
  oled.setFont(FONT6X8);
  oled.print(F(" OLED!"));
  oled.setCursor(0, 2); //two rows down because the 8x16 font takes two rows of 8
  oled.println(F("test")); //println will move the cursor 8 or 16 pixels down (based on the front) and back to X=0
  oled.print(F("test test test test test")); //lines auto wrap

  delay(3000);
}
[/codesyntax]