

I recently bought a nice looking shield for experimenting with, it was based on a Nokia LCD, I believe is used in the Nokia 6100 mobile phones. Its a colour LCD and you can see it pictured underneath. The text is clear on the screen, sadly my picture taking isn’t as good.
The Colour LCD Shield provides an easy method of connecting the popular Nokia 6100 LCD to your Arduino. The board comes as shown with the 128×128 mini colour LCD, as well as a backlight driver circuit (boosts to 7V), and three momentary push-buttons (tied through a jumper to pins D3-5).
The Nokia 6100 LCD is controlled through a 9-bit SPI interface. The control pins of the LCD are connected to the hardware SPI pins of the Arduino (D13 -SCK, D11 – DIO), the CS pin is tied to D9 and the reset pin is connected to D8. Voltage from the ‘5V’ pin of the Arduino is boosted to 7V to power the LCD backlight.
Note: This shield uses the Philips PCF8833 controller.
Initially I had a fair bit of trouble getting this up and running, reading up on the LCD I discovered that in fact there are different chips used on the LCD and guess what I was using the wrong one in my code. My LCD uses the Philips PCF8833 controller and not teh Epson controller , DOH.
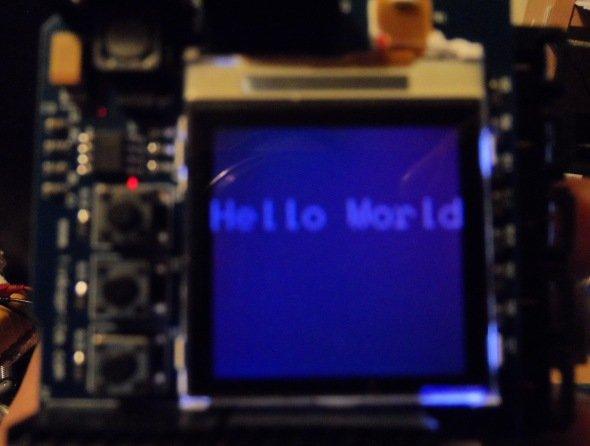
nokia lcd shield
Code Examples
I tried 2 libraries and managed to get the LCD going, the first library is the Colour LCD Shield Arduino Library
#include <ColorLCDShield.h>
LCDShield lcd;
byte cont = 40; // Good center value for contrast
void setup()
{
lcd.init(PHILLIPS); // Initialize the LCD, try using PHILLIPS if it’s not working
lcd.contrast(cont); //
lcd.clear(WHITE); // Set background to white
testPattern(); // Print color bars on bottom of screen
}
void loop()
{
}
void testPattern()
{
lcd.setRect(1, 2, 131, 19, 1, WHITE);
lcd.setRect(1, 19, 131, 35, 1, YELLOW);
lcd.setRect(1, 35, 131, 51, 1, CYAN);
lcd.setRect(1, 51, 131, 67, 1, GREEN);
lcd.setRect(1, 67, 131, 83, 1, MAGENTA);
lcd.setRect(1, 83, 131, 99, 1, RED);
lcd.setRect(1, 99, 131, 115, 1, BLUE);
lcd.setRect(1, 115, 131, 131, 1, BLACK);
}
The second library and the best is the G-LCD library, you can download this here. Download and put the library in your Arduino libraries folder
This example is a basic hello world example, you really need to dig into some of the pre-written examples. I recommend this library
#include <gLCD.h>
const char RST = 8;
const char CS = 9;
const char Clk = 13;
const char Data = 11;
gLCD graphic(RST,CS,Clk,Data,HIGH_SPEED);
void setup()
{
graphic.begin(0,0,0,PHILLIPS_0);
//background black and clear the screen
graphic.setBackColour(GLCD_BLACK);
graphic.Clear();
}
void loop()
{
//white large text
graphic.setForeColour(15,15,15);
graphic.setFont(7);
graphic.setCoordinate(1,40);
graphic.print(“Hello World”);
while(1);
}
Links
Generic Color LCD Shield Nokia 6100 Expansion Board for Arduino DIY Develop from AMAZON US
Generic Color LCD Shield Nokia 6100 Expansion Board for Arduino DIY Develop from AMAZON UK