

We bought an ethernet shield for our Arduino’s and were wondering what sort of project could we do, we could have just made one of the default examples such as web server but why not create this with a little twist, we connected a BMP085 breakout to the shield and the plan is to create a web server that displays various readings from the BMP085, sounds difficult but its pretty straightforward.
Overview
I placed the ethernet shield on the Arduino and the connected the BMP085 as follows
Connect the VCC pin to the 3.3V power source to be safe, some breakouts have a 3.3v regulator on board so you can connect 5v. I just used the 3.3v as its available on the Arduino anyway.
Connect GND to one of the ground pins.
Connect the SCL clock pin to Analog pin 5
Connect the SDA data pin to Analog pin 4
Layout
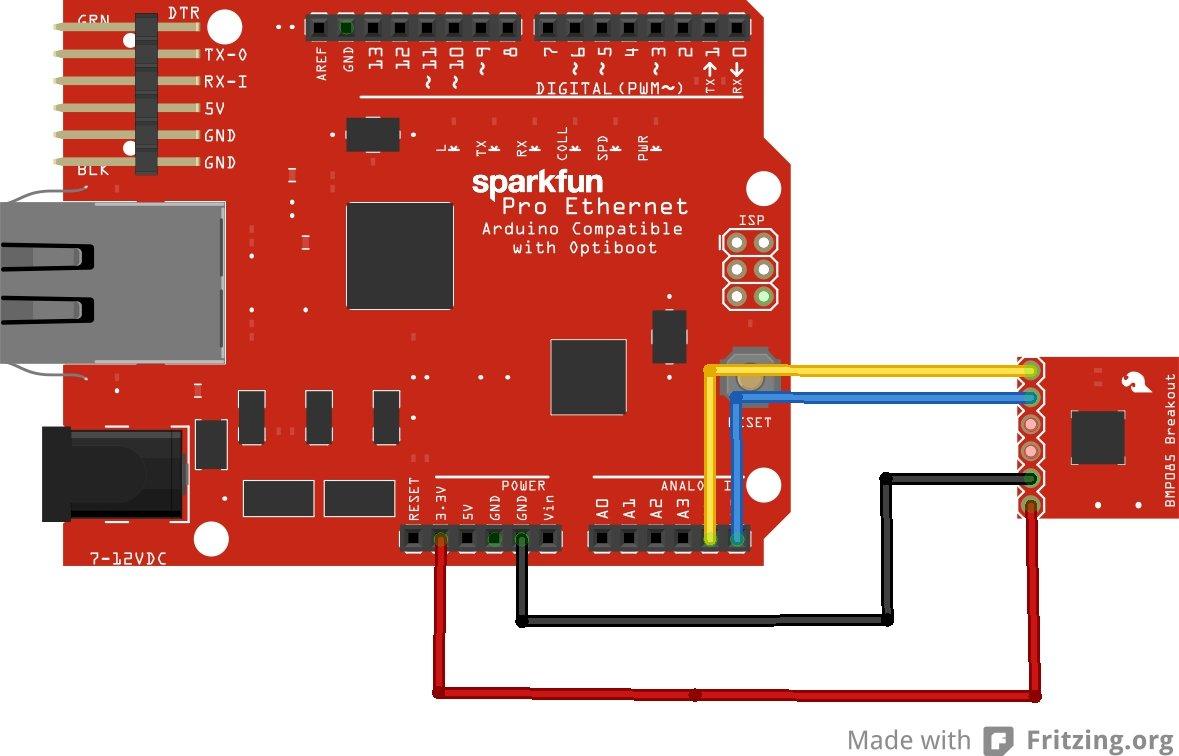
ethernet and bmp085
Schematic
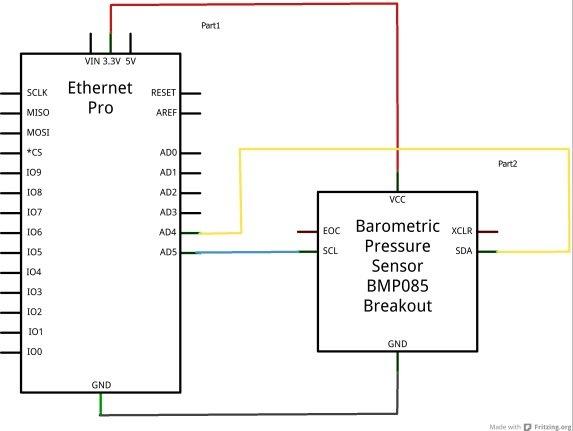
ethernet and bmp085 schematic
Code
You will need the BMP085 library to make life easier. You can get this from https://github.com/adafruit/Adafruit_BMP085_Unified/archive/master.zip. Extract this and put it in your Arduino Libraries folder
#include <Wire.h>
#include <SPI.h>
#include <Ethernet.h>
#include <Adafruit_BMP085.h>
Adafruit_BMP085 bmp;
// Enter a MAC address and IP address for your controller below.
// The IP address will be dependent on your local network:
byte mac[] = {
0xDE, 0xAD, 0xBE, 0xEF, 0xFE, 0xED };
IPAddress ip(192,168,1,177);
// Initialize the Ethernet server library
// with the IP address and port you want to use
// (port 80 is default for HTTP):
EthernetServer server(80);
void setup()
{
// Open serial communications and wait for port to open:
Serial.begin(9600);
Ethernet.begin(mac, ip);
server.begin();
Serial.print(“server is at “);
Serial.println(Ethernet.localIP());
if (!bmp.begin())
{
Serial.println(“Could not find a BMP085 sensor!”);
while (1) {}
}
}
void loop()
{
// listen for incoming clients
EthernetClient client = server.available();
if (client)
{
Serial.println(“new client”);
// an http request ends with a blank line
boolean currentLineIsBlank = true;
while (client.connected())
{
if (client.available())
{
// send a standard http response header
client.println(“HTTP/1.1 200 OK”);
client.println(“Content-Type: text/html”);
client.println(“Connection: close”); // the connection will be closed after completion of the response
client.println(“Refresh: 5”); // refresh the page automatically every 5 sec
client.println();
client.println(“<!DOCTYPE HTML>”);
client.println(“<html>”);
//output the temperature
client.print(“Temperature “);
client.print(bmp.readTemperature());
client.print(” celsius”);
client.println(“<br>”);
//output the pressure
client.print(“Pressure “);
client.print(bmp.readPressure());
client.print(” Pa”);
client.println(“<br>”);
//output the altitude
client.print(“Altitude “);
client.print(bmp.readAltitude());
client.print(” metres”);
client.println(“<br>”);
client.println(“</html>”);
break;
}
}
// give the web browser time to receive the data
delay(1);
// close the connection:
client.stop();
Serial.println(“client disonnected”);
}
}
In use
You have to connect your ethernet shield up to your network. The IP address is hard coded as 192.168.1.177. Open your favourite web browser and navigate to http://192.168.1.177/. After a short period of time you should see something like the following
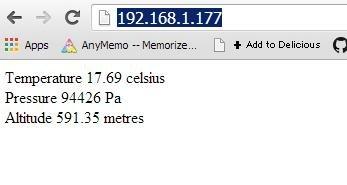
browser with readings
Links
US Links
SainSmart Ethernet Shield for Arduino UNO
BMP085 Digital Temperature Module Atmospheric Pressure Sensor Module Altimeter Module
UK Links
SainSmart Ethernet Shield for Arduino UNO from Amazon
BMP085 Digital Temperature Module Atmospheric Pressure Sensor Module Altimeter Module