

The wemos d1 is an Arduino Uno-like wifi board based on ESP-8266EX. You can use the Arduino IDE, NodeMCU and there are other development environments available
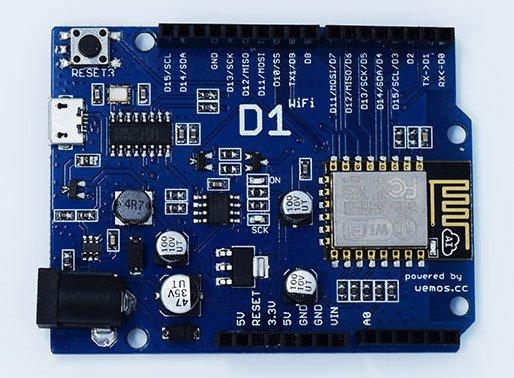
Wemos D1
There is a USB connector, note that its a micro type and you can use this and also OTA for programming. I used the USB cable, it was the easiest way. The board can be pwered via the usb cable or you can plug in an external DC source, in the range of 7v to 24v. I recommend 9v.
The table below shows the pins of the wemos d1, the main difference between this and the Arduino UNO is that there is only one Analog input. All I/O pins are 3.3v, so some arduino shields will not work and obviously be careful what you connect to these pins.
| Pin | Function | ESP-8266 Pin |
|---|---|---|
| D0 | RX | GPIO3 |
| D1 | TX | GPIO1 |
| D2 | IO | GPIO16 |
| D3(D15) | IO,SCL | GPIO5 |
| D4(D14) | IO,SDA | GPIO4 |
| D5(D13) | IO,SCK | GPIO14 |
| D6(D12) | IO,MISO | GPIO12 |
| D7(D11) | IO,MOSI | GPIO13 |
| D8 | IO,Pull-up | GPIO0 |
| D9 | IO,pull-up, BUILTIN_LED | GPIO2 |
| D10 | IO,pull-down,SS | GPIO15 |
| A0 | Analog Input | A0 |
Installing with Boards Manager
Starting with Arduino IDE 1.6.4, the software allows installation of third-party platform packages using Boards Manager. There are packages available for Windows, Mac OS, and Linux (32 and 64 bit).
Install Arduino 1.6.5 from the Arduino website.
Start Arduino and open Preferences window.
Enter http://arduino.esp8266.com/stable/package_esp8266com_index.json into Additional Board Manager URLs field. You can add multiple URLs, separating them with commas.
Open Boards Manager from Tools > Board menu and install esp8266 platform (and don’t forget to select your ESP8266 board from Tools > Board menu after installation).
Code
You can open the examples folder and upload the blink sketch, its copied below for reference
[codesyntax lang=”cpp”]
void setup() {
pinMode(BUILTIN_LED, OUTPUT); // Initialize the BUILTIN_LED pin as an output
}

// the loop function runs over and over again forever
void loop() {
digitalWrite(BUILTIN_LED, LOW); // Turn the LED on (Note that LOW is the voltage level
// but actually the LED is on; this is because
// it is acive low on the ESP-01)
delay(1000); // Wait for a second
digitalWrite(BUILTIN_LED, HIGH); // Turn the LED off by making the voltage HIGH
delay(2000); // Wait for two seconds (to demonstrate the active low LED)
}
[/codesyntax]
Links
https://github.com/esp8266/Arduino
http://www.wemos.cc/wiki/doku.php?id=en:d1
Gikfun WeMos D1 WiFi UNO Based ESP8266 for Arduino IDE Compatible Development Boards EK1715