

In this article we will take a look at the MPL3115A2 pressure sensor and connect it to our Raspberry PI. lets take a look at the MPL3115A2 first
The MPL3115A2 is a compact, piezoresistive, absolute pressure sensor with an I2C digital interface. MPL3115A2 has a wide operating range of 20 kPa to 110 kPa, a range that covers all surface elevations on earth. The MEMS is temperature compensated utilizing an on-chip temperature sensor. The pressure and temperature data is fed into a high resolution ADC to provide fully compensated and digitized outputs for pressure in Pascals and temperature in °C.

The compensated pressure output can then be converted to altitude, utilizing the formula stated in Section 9.1.3 “Pressure/altitude” provided in meters.The internal processing in MPL3115A2 removes compensation and unit conversion load from the system MCU, simplifying system design
Layout
Lets look at how you connect the sensor to your Raspberry Pi
An I2C device that just needs 3.3v and GND as well, so its pretty simple to connect to your Raspberry PI, the layout below shows a Raspberry PI 3 but you can use others as well
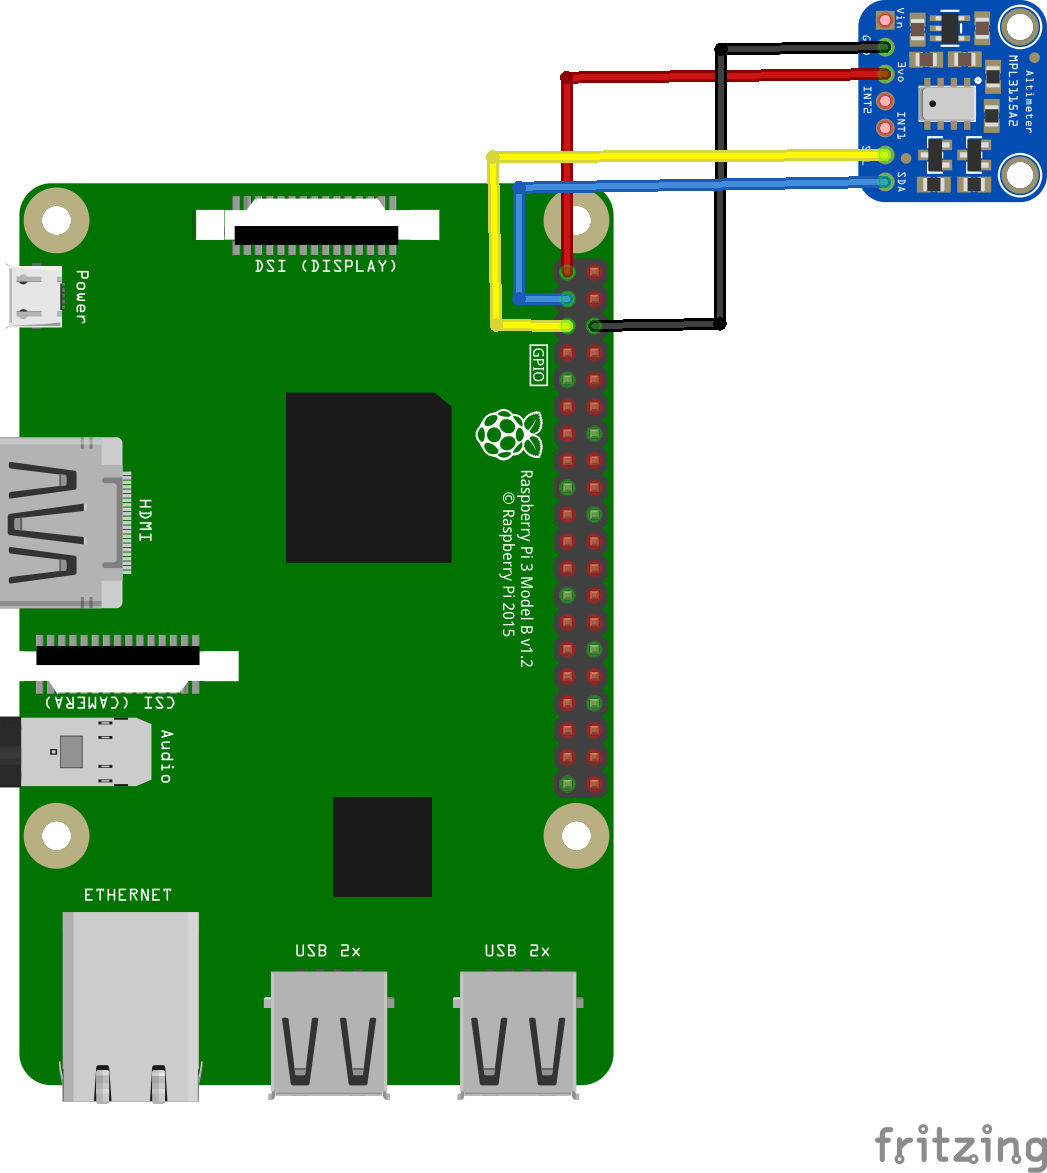
pi and MPL3115A2 layout
Parts List
Here is a parts list generated from the fritzing layout above. The sensor costs about
| Amount | Part Type | Properties |
|---|---|---|
| 1 | MPL3115A2 I2C Barometric Pressure, Altitude, Temperature Sensor | MPL3115A2 I2C Intelligent Temperature Pressure Altitude Sensor V2.0 |
| 1 | Raspberry Pi 3 | Original 2018 New Raspberry Pi 3 Model B+plus Board 1GB LPDDR2 BCM2837B0 Quad-Core Ras PI3 |
This is a python example, the code comes from CodeEverything as you can see in the comments
Code Example
[codesyntax lang=”java”]
// Distributed with a free-will license.
// Use it any way you want, profit or free, provided it fits in the licenses of its associated works.
// MPL3115A2
// This code is designed to work with the MPL3115A2_I2CS I2C Mini Module available from ControlEverything.com.
// https://www.controleverything.com/products

import com.pi4j.io.i2c.I2CBus;
import com.pi4j.io.i2c.I2CDevice;
import com.pi4j.io.i2c.I2CFactory;
import java.io.IOException;

public class MPL3115A2
{
	public static void main(String args[]) throws Exception
	{
		// Create I2C bus
		I2CBus Bus = I2CFactory.getInstance(I2CBus.BUS_1);
		// Get I2C device, MPL3115A2 I2C address is 0x60(96)
		I2CDevice device = Bus.getDevice(0x60);

		// Select control register
		// Active mode, OSR = 128, altimeter mode
		device.write(0x26, (byte)0xB9);
		// Select data configuration register
		// Data ready event enabled for altitude, pressure, temperature
		device.write(0x13, (byte)0x07);

		// Select control register
		// Active mode, OSR = 128, altimeter mode
		device.write(0x26, (byte)0xB9);
		Thread.sleep(1000);

		// Read 6 bytes of data from address 0x00(00)
		// status, tHeight msb1, tHeight msb, tHeight lsb, temp msb, temp lsb
		byte[] data = new byte[6];
		device.read(0x00, data, 0, 6);

		// Convert the data to 20-bits
		int tHeight = ((((data[1] & 0xFF) * 65536) + ((data[2] & 0xFF) * 256) + (data[3] & 0xF0)) / 16);
		int temp = ((data[4] * 256) + (data[5] & 0xF0)) / 16;
		double altitude = tHeight / 16.0;
		double cTemp = (temp / 16.0);
		double fTemp = cTemp * 1.8 + 32;

		// Select control register
		// Active mode, OSR = 128, barometer mode
		device.write(0x26, (byte)0x39);
		Thread.sleep(1000);

		// Read 4 bytes of data from address 0x00(00)
		// status, pres msb1, pres msb, pres lsb
		device.read(0x00, data, 0, 4);

		// Convert the data to 20-bits
		int pres = (((data[1] & 0xFF) * 65536) + ((data[2] & 0xFF) * 256) + (data[3] & 0xF0)) / 16;
		double pressure = (pres / 4.0) / 1000.0;

		// Output data to screen
		System.out.printf("Pressure : %.2f kPa %n", pressure);
		System.out.printf("Altitude : %.2f m %n", altitude);
		System.out.printf("Temperature in Celsius : %.2f C %n", cTemp);
		System.out.printf("Temperature in Fahrenheit : %.2f F %n", fTemp);
	}
}
[/codesyntax]
copy it to your Raspberry PI, open a terminal and run
Compile the java program.
$> sudo pi4j MPL3115A2.java
Run the java program.
$> sudo pi4j MPL3115A2
Output
You should see something like this in the terminal window
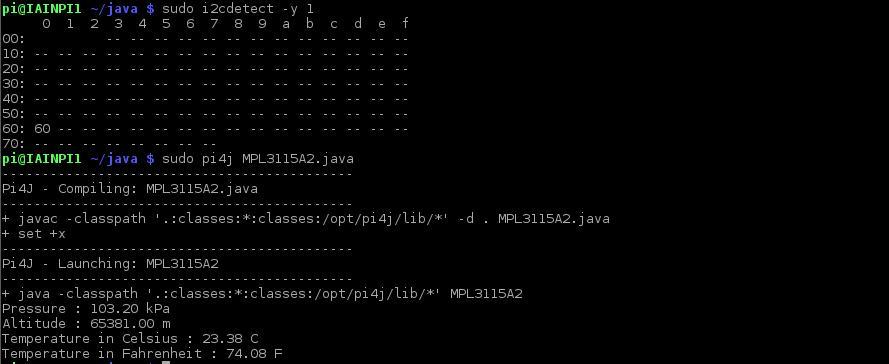
mpl3115a2 output